Showing posts with label Smith's Antiques. Show all posts

June 7, 2012

Chest of Drawers Given New Life

Hello Blogland.  I went AWOL for a few days but I did not forget about you.  I've just been a busy little bee.  I had given myself and insanely crazy to-do list of things to conquer over the last few weeks and at the end of the days I've just been worn out.  But, I'm energized now and back to action.  Well, I've been in action, I just haven't been blogging about it.  Now I am.  I didn't want to get in trouble by my grandpaw for not posting often enough.  It's his way to keep up with me.  Love you Paw-Paw!!

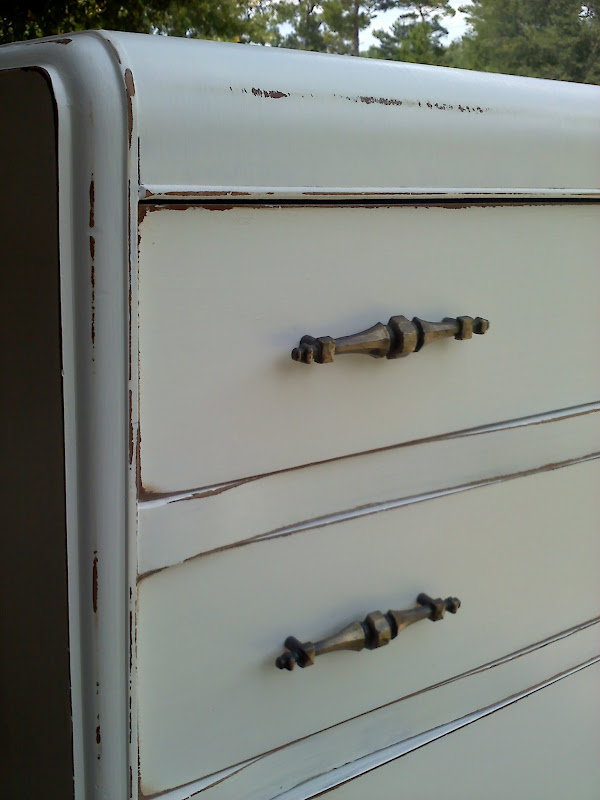
Okay, so here's a little after and before of a dresser I just finished last week:

 I picked this piece up at the base thrift store that I work at.  I paid a little bit more than usual for a few reasons. 1. I needed some more big furniture pieces. 2. The drawers worked perfectly and the chest didn't need any work. 3. The drawers worked perfectly and the chest didn't need any work. 4. The drawers worked perfectly and the chest didn't need any work.  Okay, I guess you get the point.  Sometimes it's nice to pay a little extra and know that I don't have to do any repair work.  And, the original hardware....oh so lovely!
 I sanded it all down with a 120 grit using my Dewalt orbital sander.  I really couldn't make it through the day without this little guy...the sander that it.  Next up it got a sloppy coat of Smart Prime by Benjamin Moore.  I've been using this stuff for a couple of years now and have really been happy with the adherence, durability, coverage, and efficiency.
 
 The primer was followed with two coats of Cabinet Coat paint, also by Benjamin Moore.  A friend of mine had this left over from a project (and it was nearly full) and she asked me if I wanted it.  Umm, YES PLEASE!!  And, thank you!

 You can see that my assistant was working real hard here.
 After everything dried well, I gave it light to medium distress using a 220-grit paper.  The original hardware was put back on.
 And then it all got a good coat of Minwax Paste Wax, in Natural.
 I love the simple shabby chic vibe from this piece.  So cute!  It's now available at Smith's Antiques in Destin.
 And, here's a couple updated shots of my booth at De'France in Fort Walton Beach.


I'm linking up to the great parties:


{Primp}

May 29, 2012

Upcycled Table and Some New Signs

Wouldn't it be really cool if I could have some creative titles for my posts?  I agree.  It would be really cool.  Unfortunately, my creative juices do not flow in that direction very often...hence the plain ol' title.

I finally did it...I gave in to the peer pressure.  I joined Pinterest.  Hopefully, I don't give in to the addiction that I hear it causes.  Either way, I'm moving forward with the times.  

Today was pretty productive.  I ran this morning, worked at the base Thrift Shop most of the day, and worked in the garage for the rest of the afternoon and evening (I'm tackling my own dining room table).  I really want a harvest table, but we've sold all the one's that the hubby has made and now he's too booked to fit me into the upcoming schedule. :(  Well, he's fitting me in, just not taking many building requests!  Now, this evening, the little puppy and I are working at cleaning up my office.  I should probably say I'm working on cleaning it and he's shedding his hair behind me, thus negating my efforts.

Speaking of efforts...here's a recent project that required basically no effort.  It was an old sewing machine base and a piece of butcher block.  I screwed the butcher block onto the base from the underside.  Easy project? Check.  Fast project? Check. Super cute table? Check.  Winner in my books!  Winner winner chicken dinner!


 Also, here's a quick picture of some new signs now available in my booth at Smith's.  I just got these down there yesterday.  That was after I fought all of the Memorial Day traffic to get there...ugh!  Oh well, hopefully they will be a big hit and it will all be worth it.

Linking here:

Primitive and Proper


May 19, 2012

Shutter Shelf

Hello Friends!  I've missed you the last few days.  I missed a couple days of blogging because I just tried to cram too much in my day and flat ran out of time.  And when bedtime calls, I must answer, even if the blog post is not written.  Generally bedtime calls me by 9:30 each night...I know, I'm an oldie!  But, in my defense, I do start my day around 5 or 5:30 generally.  

Okay, on another totally random note, I feel the need to share a tiny little garage sale conversation that took place this morning.  It's one of those "you know you live in the south if..." kind of stories.  Don't know about you, but I always feel the need to say thank-you to the garage sale host or hostess, especially if I don't buy anything.  So, I'm at a sale, hosted by a sweet little old man.  I had first asked him how he was doing and he said "purty good seein's how my gettin' up early ain't caught up to me just yet".  Then, I shop his sale (which consisted of two tables). Side note: can you really call it a garage sale and go the trouble of having it and advertising if it's only two tables??  And no, he wasn't just sold out...this was at 7:15.  Anyhoo, I didn't buy anything and I'm leaving so I give him my usual "thank you" to which he responded, "yee-huh".  For those of you that might not know, that's code for 'you're welcome'.  And it's pronounced just like I wrote it: "yee-huh".  I got in my car and just smiled...yep, I'm in the south!

Alright, onto a little shelf I whipped up last night.  I sold a couple of really big pieces in the last couple of days in some of my booths and I was in desperate need of a display shelf.  I haven't found one recently (or at least one I was willing to pay the price for), so I decided to consult my scrap wood-and-other-stuff pile.  I had four old shutters that were no good for display anymore...slats falling out, some rotted parts, wobbly, etc, so I turned them into this, which happened turn out to be very sturdy.  Voila...I just love a good upcycled project!
 Here's what the shutters started out like.  There were four of them that I had picked up of the side of the road when we first moved to Florida.
 I used the compound sliding miter saw and cut two pieces to serve as the sides.  I figured I would start there and see what I had left to work with.  I then cut three pieces to use as the shelves.  Don't tell my husband, but I didn't measure anything.  He's a perfectionist and would not be happy to know this.  I knew the shutters were the same length, so I picked the same spot on each one to make the cuts.
 Here's what I had left after cutting my pieces.  You know they are past the point of return when even I throw them out...goodbye shutter remains!
 The picture below shows the shelf starting to be put together.  What you see on the top is actually the side panel.  I stood the shelves upright and placed the side panel on top of them.
 I screwed all the shelves on using some really long screws to provide extra stability.  I didn't pre-drill anything for this project, because the wood was fairly soft.
 Once I screwed through the side panel (1 screw into each corner of the end of the shelf) into the shelf ends, I flipped the entire unit over and added the remaining side panel.  Worthy of mentioning here is the fact that I did have to screw and unscrew a few of my joints, to get it straight.  Had I measured in the get-go, I could have eliminated this, but since I was eyeballing, my shelves weren't totally straight the first time.  This piece didn't need to be perfect due to the sheer rusticness of it, but I at least needed level shelves!  Pretty good for a 15 minute project if I do say so myself.

I just got home from working my booth at Smith's where this baby is staying until someone takes it home! (Excuse the poor picture quality: my phone + fluorescent lights = really bad pictures).
Here's a few other Smith's booth picture updates (of course, they are also horrible picture quality...sorry!!)


Linking up with these gals:


Photobucket

April 25, 2012

Old Window Becomes Memo Board

Good evening Peeps!  Today was a busy day and it's way too late for me to just now be starting to wind down for the day, but that's the case.  I worked at a client's for the majority of the day and I've been trying to finish up multiple customer projects this evening -- painting tables, suitcases, and bar stools.  Plus, somehow I managed to detail the hubby's truck interior this afternoon.  All in all, I'd say it's been a good day.

Now, I'm excited to share this project with you.  I absolutely love it.  I have a rule though...it has to have a home in my home if I keep it and this one just didn't, so now it's for sale.

I started with an old wood window frame.  I have had this in my stash for a while and paid next to nothing for it a while back.

 
I picked up chicken wire at Ace hardware and simply used tin snips to cut it to fit the back of the frame.  (Wear gloves or be SUPER careful doing this...this stuff gets really sharp).  I stapled it onto the wood frame from the back.  I really did have pictures of all of this, but as usual, my phone ate half of them, so now all you get is the finished piece.

I used two d-ring hangers on the back on each side about 1/3 of the way down from the top.  I then tied a double strand of twine rope through the d-rings to create a hanger that adds to the rustic feel of this piece.  (Oh, and please ignore the pile of junk stash of weathered wood found on the side of the road that's leaning up against the side of the house!  As previously mentioned, we are THOSE neighbors.)
 

It's perfect for notes, memos, pictures, recipes, project ideas, grocery lists, and much more.  Did I mention I loved this and had a hard time parting with it??  Well, I did.

This piece is currently available at Smith's Antiques. 

Linking up here:

{Primp}
 

March 22, 2012

The Story of the Buffet that Returned to Me

Just a quick share of a recently completed buffet.  Long story short--I saw this buffet at an estate sale.  I loved it.  I wanted it.  I ran straight to it when the line opened.  Someone had already claimed it.  It sold for $20. Yep, you heard read that right. 20 smackaroos.  Saddness took over me.  I was bummed...really bummed.

Fast forward a few months.  I had another buffet that I wasn't so in love with.  It really was a great sturdy piece, but it was very 50's retro style, which is great, it's just not my personal style.  It had moved between a couple of my booths and still hadn't sold.  Then, someone approached me and asked me if I would trade that buffet for another buffet they had AND a cedar wardrobe.  Umm...YES, most definitely YES...didn't even need to see the buffet.  But, when I did....oh, be still my heart....it was this one.  The same one from the estate sale.  I love it when God gives me good little surprises!

Let's just say it didn't look as good and chippy as it does in this picture (but I don't have a good before pic).  Let's also say that NONE of the drawers/doors worked properly.  Lucky me, I have a bit of skill with the power tools and I have a handy hubby and daddy who were happy to assist.  Needless to say, this piece turned out stunning in the end.  PS-did you know that you can use finishing wax to help drawers slide better...just rub it on the drawers and slides and it make it slide like butter (well, most of the time that is).


This piece went to Smith's where it didn't last too long.  Hopefully it has a good home somewhere now.  I'm guessing it's somewhere along the beach in a nice little cottage-y condo.

I'm linking up at these fabulous parties:


Add caption