June 30, 2012

How to Antique Using Wood Stain

Hey Folks! Welcome to the weekend!  I'd say I've been relaxing and soaking up the sun, but for today, that isn't very close to reality.  In fact, I hit a few garage sales this morning...nothing to get excited over...worked with a client of mine for a couple of hours, finished up the table you will see below and delivered it to a client, and worked around the house on my to-do list that grows at a faster rate than I would like to admit.

The hubby is at the office.  He's been putting in some major hours this week, so that hopefully he can take off a few days next week while his family is in town.  We can't wait to see his parent's, one of his sisters, and his two nieces!!!  We are looking so forward to our time with them.

I have a few things that need to get done by Monday evening, so I'm not sure how much relaxing will take place this weekend, but I can assure you there will be some productiveness.  Is it kinda sick that working a being productive is relaxing to me?  Who am I kidding, if you're reading this, you're probably that way too!

Okay, enough rambling, onto the table.  Here's the before of this french style table that was just a bit outdated.  This piece was for a local client here in town.

 I started by giving it a good sanding all over.  And then a coat of Benjamin Moore Smart Prime.
 Next up, she got two coats of a Benjamin Moore cabinet coat (in a creamy-ish white).
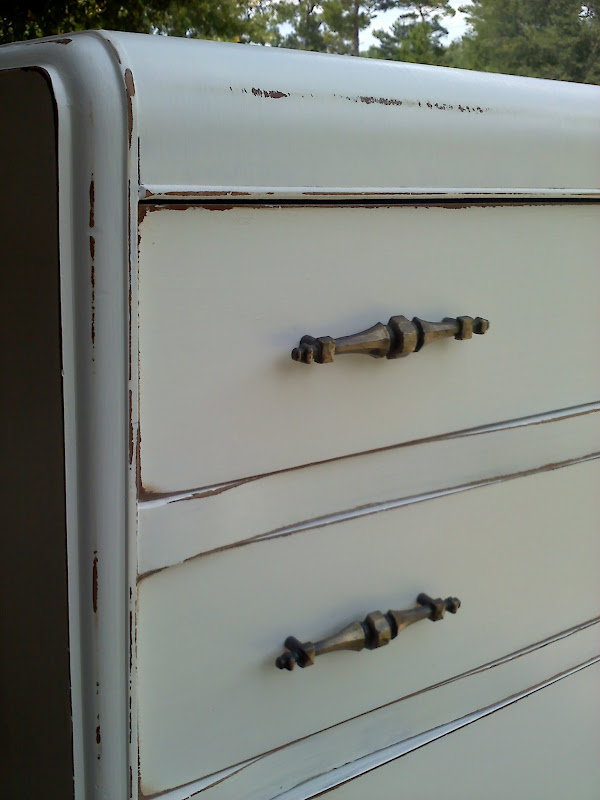
Once the paint had a couple days to dry, I distressed the entire piece with a medium distress.  I primarily hit the table legs and the table top edges, but left the flat surface of the table alone.  I wanted to soften the piece a bit more and give it a little antiqued look without going to rustic (you know I love me some rustic-ness).  Anyhoo, I decided to use my wood stain to do this and I chose the color Provincial.
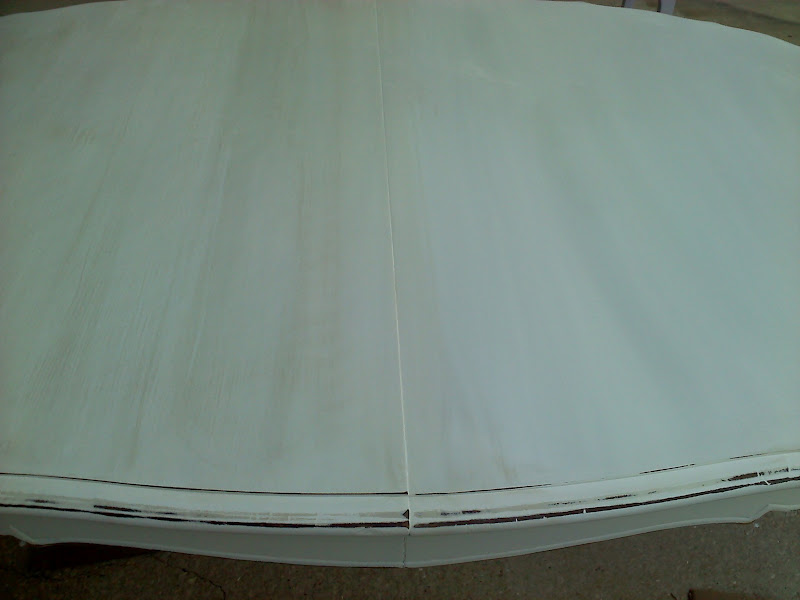
 It's hard to tell in this picture, but the left half of the table has been antiqued and the right half has not.
 Here's a side by side of antiqued vs. not antiqued.  Again, a bit hard to see, but you can see the warmth and toned down look that the antiqued side (left) has.
 To do this, I first sanded down the table top surface with steel wool to smooth out the paint job really well.  Then, I used the stain to antique.  I wasn't too happy with the amount of antiquing it was leaving behind because of the super smooth finish.  So, instead, I went back over the table top with a 220 grit, just to give it a slightly rougher surface to work with.  Then I used a cheap foam brush and wiped on my stain in the direction of the grain/paint strokes.  I worked in about 6 inch sections, so it wouldn't dry too fast.
 Once the stain was brushed on, I used an old (but clean and lint free) rag to wipe it off and blend it.  Yes, my arms really are that hairy.  Thanks Dad for the hairiness I inherited.  It's like I have my very own little forest on my arm.  When I get cold and get goose bumps, it's like all the trees of the forest stand straight up.  I'm sure you didn't come here to hear about my arm forest, so I will move on.
 Here's a better glance and the before and after using the stain.  The left side has not been antiqued yet while the right side has. 
I did the legs and the apron as well, but left a bit more stain in the crevices in those areas to really add depth and dimension.  After letting the stain dry for 24 hours, the entire piece was waxed with clear paste wax (Minwax).  Then, in true goober fashion, I delivered the table and never got a picture.  I will swing by my customers and snap one next week.  This piece is available for viewing and purchase at BayHouse Antiques in Bluewater Bay (Niceville), FL.

Linking up here:
 Primitive and Proper


 {Primp}


June 27, 2012

Dresser Gone Glam!

Well, hello beautiful!  That's what I was saying to this dresser/buffet that I finished this afternoon.  I had to run errands and work my booth spaces this morning playing catch up from the lack of work that I did last week with my company in town.  I also signed on for a new booth space at a brand new antique/unique furniture market that is being opened by a great friend of mine in Fort Walton Beach....Plethora.  It's located just off of Carson which is off of Walter Martin near the Uptown Station.  They open this weekend, so be sure to check it out!!

Then it was home to do some house work and get to painting.  Tonight I've been keeping one of my little neighbor girls, so I'm just now fitting in time to post.  This buffet/dresser is for a client that I work with on a regular basis.  It is being transformed to go into a pink and purple glamorous bedroom.  This piece has great french style lines and started out as a basic black.

 I started by spraying the inside silver to give it that glamorous pop of color on the inside.
 The entire piece was sanded with 120 grit paper and primed with very light lavender.  It then received two coats of Lingering Lavender by Benjamin Moore.  This is a white with a hint of lavender in it.  The original hardware was used, but was spray painted a metallic silver.
Next up was just putting it all back together.  The silver adds a perfect pop of bling.
 Here's the final product:
This piece certainly look different that what it started with.  I'm happy with it and I sure hope my customer is too once it gets delivered tomorrow.

June 26, 2012

What's Been Keeping Me Busy & A Chest Makeover

I'm baaaackkkk.  Okay, so I've been a not so good blogger for a bit.  But, in my defense, I've been hanging out with these cuties!  Two of my nieces, Avery & Jordyn, have been visiting us for the last week.  We LOVED hanging out together, but they don't leave a lot of room for getting much "work" done.


My Dad and his Tennessee lady friend were also here.  We all had such a great time just spending time together. We did very important things like going to the beach, swimming at home, water balloon fights, the local park/splashpad, Chuck E. Cheese, the neighbors boat, hanging out with neighbor friends, playing in tents, and lots more.  As you can see, there just wasn't much room for working on projects or blogging about them.

So, this week I'm playing catch up. Big time.  But, I wouldn't trade it.  I'm sharing a chest of drawers makeover that I recently finished for a client.  She came and looked at the unfinished furniture I had on hand and chose this chest for me to finish for her bedroom.

 It was super rainy for about 10 days in a row just before my company came, so I had to snap a pic in the garage, which just isn't the best lighting.
 For this piece, the top was sanded down to bar wood and stained with dark walnut.  The body was sanded and painted with my custom grey paint mix.  Two coats, followed by a light distressing.  The entire piece got two coats of wax.  The original wood knobs were painted in an oil rubbed bronze.
 I love the way it turned out and my client was very happy.  In fact, this week, I will be working on some more furniture for her bedroom.  Can't wait to get started!

June 13, 2012

Super Simple Dry-Brushed Coffe Table

Good morning world!  The puppy and I just got back from a three mile run and we are feeling energized.  Actually, he's laying on the floor wiped out and I'm energized.  Lots to do today, so I need to keep the energy going.  We've got company coming this weekend (can't wait to see my Dad, his girlfriend, and two of my neices!!) so I'm powering through another to-do list that I've given myself.

Yesterday was pretty full: putting dinner in the crockpot, work at the Thrift Shop, work at a client's house, come home to what should have been dinner and discover that the power was off yesterday morning for an hour and a half and the crockpot just doesn't restart itself when this happens...ugh, furiously scrounge up dinner (because it's Tuesday and that's my dinner share night for the neighborhood), pick up friends at the airport, start to clean out my office closet, hang with the hubby and the puppy.  My point is...as you can see there was no house cleaning or painting going on in that schedule.  Both of which need to be done.  So, today, that's what I'm doing!

But, first I'm sharing with you another REALLY easy dry-brush project:


 I picked up this little coffee table from a friend of mine.  We traded some items, and this was one that I came home with.  All I did to get started was wipe it down with a damp rag.
 I then dry-brushed on some Annie Sloan Old White.  As you can see, there was no perfection going on here.  The only thing I really tried to do was go with the direction of the grain.
 You can see that some parts are a little heavier painted than others...no big deal.  It adds to the overall look of the piece.
 Next I used my orbital sander and went over it a bit just to blend it a little.
 Next it got a coat of Minwax Paste Wax.  And ta-da....15 minutes later you have a completed project!
 

Linking up here:

June 11, 2012

Cottage Chic Nightstand Makeover

YAY!  I'm happy to report that after a LONG month and a half apart, the hubby is safely home.  Too bad there is a lot more time apart on the horizon.  But, for now, the little puppy and I are just loving having him home with us.  This weekend was wonderful...just being lazy and hanging out together!

I did manage to squeeze in a few projects though.  I've been busy painting some furniture for some clients.  It's not all fully finished yet, but I'll share pics once it is.  In the meantime, here's a little cottage chic nightstand that recently got a little makeover.  Really, is paint amazing or what?!?!?

 Here's the blah-ness we began with:
 I started by giving it a really good cleaning and then a very sloppy haphazardly painted coat of Annie Sloan Chalk Paint in Old White.
 After the Old White dried (which doesn't take long with ASCP), I dry brushed on a some strokes of Provence and Chateau Gray. 
 
 I then sanded a little bit to blend together slightly.
 Next up, I worked in sections using the wax.  First a section would get a light coat of clear wax, simply applied with an old rag.  Then using a chip brush (because my wax brush needed cleaning), I used the Annie Sloan dark wax and worked it into all the crevices that were created using haphazard brush strokes while applying the paint.  It really does not take much dark wax at all.  This stuff goes a LONG ways.  The clear wax...not so much.  It definitely takes a bit more, but the end result is soooo worth it.  So, after applying the dark wax, I then take the rag with clear wax and basically wipe off the dark wax.  I generally take my rag and go in small circular motions, but I don't really thing there is a right or wrong way to do this.
 The clear wax helps remove the perfect amount of dark wax, but leaves a wonderfully aged, cottage look.  I also changed the handle on this piece.  I had one in my stash that was a loner and it happened to work perfectly.
 Here, you can really see the effects of the various colors and the wax all working together.
 This piece is headed to De'France this afternoon!
Linking up here:

Primitive and Proper


June 7, 2012

Chest of Drawers Given New Life

Hello Blogland.  I went AWOL for a few days but I did not forget about you.  I've just been a busy little bee.  I had given myself and insanely crazy to-do list of things to conquer over the last few weeks and at the end of the days I've just been worn out.  But, I'm energized now and back to action.  Well, I've been in action, I just haven't been blogging about it.  Now I am.  I didn't want to get in trouble by my grandpaw for not posting often enough.  It's his way to keep up with me.  Love you Paw-Paw!!

Okay, so here's a little after and before of a dresser I just finished last week:

 I picked this piece up at the base thrift store that I work at.  I paid a little bit more than usual for a few reasons. 1. I needed some more big furniture pieces. 2. The drawers worked perfectly and the chest didn't need any work. 3. The drawers worked perfectly and the chest didn't need any work. 4. The drawers worked perfectly and the chest didn't need any work.  Okay, I guess you get the point.  Sometimes it's nice to pay a little extra and know that I don't have to do any repair work.  And, the original hardware....oh so lovely!
 I sanded it all down with a 120 grit using my Dewalt orbital sander.  I really couldn't make it through the day without this little guy...the sander that it.  Next up it got a sloppy coat of Smart Prime by Benjamin Moore.  I've been using this stuff for a couple of years now and have really been happy with the adherence, durability, coverage, and efficiency.
 
 The primer was followed with two coats of Cabinet Coat paint, also by Benjamin Moore.  A friend of mine had this left over from a project (and it was nearly full) and she asked me if I wanted it.  Umm, YES PLEASE!!  And, thank you!

 You can see that my assistant was working real hard here.
 After everything dried well, I gave it light to medium distress using a 220-grit paper.  The original hardware was put back on.
 And then it all got a good coat of Minwax Paste Wax, in Natural.
 I love the simple shabby chic vibe from this piece.  So cute!  It's now available at Smith's Antiques in Destin.
 And, here's a couple updated shots of my booth at De'France in Fort Walton Beach.


I'm linking up to the great parties:


{Primp}