Showing posts with label Crafty. Show all posts

July 20, 2012

Playing with Colors and a Feature

First and foremost, I'd like to thank Gail over at My Repurposed Life for featuring my dining room table re-do.  I'm honored!
 Be sure to check out Gail's other features and weekly link party here:
Photobucket

Next up is more creative kid's craftiness by one of my sisters, Holly!  She's such a great Mom.  She basically does a craft each day with my nieces.  The Texas (where they live) heat so kindly lended a hand in making this one happen.  For this project, they took a blank canvas and hot glued new crayolas on it upside down.  Then, set is out in the heat and watch it work it's magic.  Now that's what I call instant art!  This one is headed for my nieces gallery art wall at their house.

April 28, 2012

Color-Coded Nature Walk

Okay, for all of you with kids...here's another fun and super easy project by one of my sisters, Holly.  She comes up with the best ideas for my nieces. 
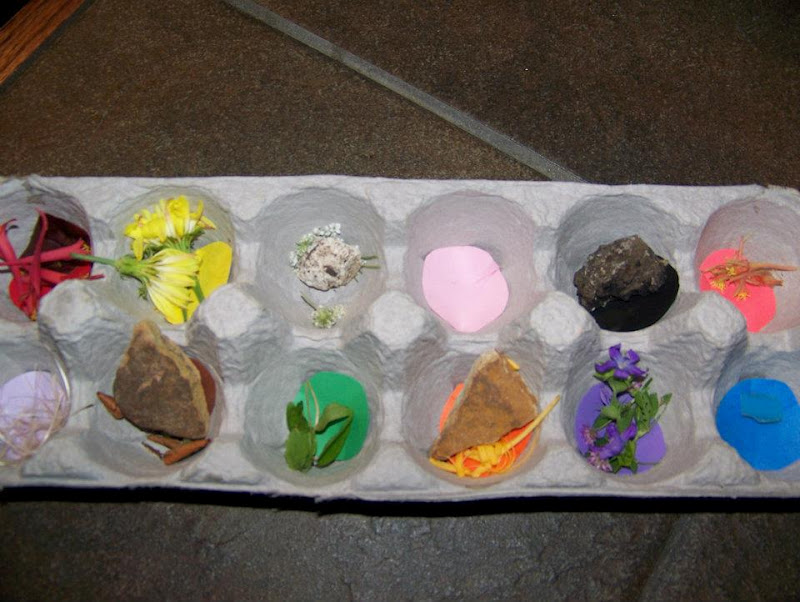
 To get started they used an empty egg carton tray and cut out a circle of various colors that they placed in the bottom of each hole.  You could get even thriftier and use paint chips for this as well.
 Then they set out on their nature walk to find things in nature that matched the colors in their tray.   Of course Avery is addicted to butterflies right now, so that's her butterfly net (also engineered by my sister.)  Thankfully Avery lets the butterflies go after she catches them.  When I was home we decided that each butterfly they catch is a kiss sent from their Noni (my Mom) in heaven.  When they release the butterflies, they are sending kisses back up to heaven for Noni.  (We had to come up with something after countless little butterflies were losing their lives after getting put in a jar. haha).
 Here's come of the colorful pieces of nature they found.
 Avery displaying the nature finds.
 Jordyn showing off the colorful spread of nature.


 Aww...just look at 'em...don't you just want to scoop 'em up and hug and hug and hug on them?  :)  Well, at least I do.  So, there you have it...a couldn't-get-easier-than-this weekend project the whole family can enjoy!!

March 31, 2012

Tea-Cher Card

Another creative idea by one of my sisters, Holly.  This was actually made last Spring, but it makes a perfect Spring gift for a teacher.  Ignore the dates on the pic...her date function is not set right on her camera.  It is simply cut out from scrapbook paper.  She free handed the image of the mug (but I'm sure you could find one online).  She made it where there were two drawings of the mug, opposite of each other and left them attached to each other on the handle.  This would then become the front and back of the card.

 Next she cut out an insert to glue to the inside of the front cover to create a pocket, to hold tea bags, etc.  On the interior of the back side she wrote: You're a Great Tea-Cher.
What a fun, quick, and easy idea to welcome Spring and honor a teacher...school, sunday school, dance, or whatever kind of tea-cher it is!

March 14, 2012

Home-Made Spray Paint

Today was so incredibly gorgeous here.  I wanted to spend every minute outside.  I started my morning early.  I put some pre-emergent down on the yard at 7:00 this morning to try to tackle the losing-battle I face with the weeds in the yard.  Watered it in and left it to dry while I went and worked at a client's house for the morning.  Then, I worked outside all afternoon...finishing up some furniture projects and a few little projects of our own.  Now if I could just get over this sinus/allergy c-rap that I have, life would be grand.

I'm super excited, because I sent the final tweeks of my new logo to my designer (www.vintagebirchdesigns.com) this afternoon.  I should have the final logo very soon.  Then, it's on to tackling this blog and making it look presentable!  Let me just say that after you see the logo, you're all going to want her to design something for you...she is simply amazing! :)  Can't wait to share it with you all.

Now on to something really fun for today.  Turns out they had gorgeous weather in Texas too.  My nieces are on Spring Break, so some of my nieces and nephews got together and had some fun in the sun with home-made spray paint.  Yeah, my sister, Holly, is pretty genius!!!  She's always coming up with AMAZING ideas for the kids.  In fact she's putting together a book right now that will hopefully be available soon with some of her ideas, tutorials, and pictures.  I'll let you know when it's available.  So here's the after shot of the spray-paint extravaganza:

To get started, she got some cheap spray paint bottles at Wal-Mart and Tempera paint at Hobby Lobby.  She took a board that they had at their house and wrapped it in a canvas (aka...old sheet) for the little artists'

 For the spray paint, she simply mixed the Tempera paint with water in the spray bottles.  It was a fairly running consistency...couldn't be too thick or it wouldn't have sprayed through the bottles.
 Artist Jordyn working on her masterpiece:
 Kyle Joe intently focused and making his artwork perfect:
 Little Avery cheesing it up while she painted her canvas:
 Double time:
 Here they are presenting their work of art.  Beautiful work my little angels!
 To get an additional project out of this, they will be cutting it into smaller pieces and framing it for the kid's art wall at my sister's house. 
How's that for cheap, easy, fun, entertaining, and getting two projects out of it??  As I said...my sister is pretty much like superwoman (actually, all of my sister's are!!)

And just so you can put some faces with my sisters that I talk about, here's our "sister" picture at my youngest sisters outdoor wedding this past summer at my Dad's house in Oklahoma.  The 4-H club: Hilary, Hannah, Holly, Heather

February 29, 2012

Painted Tin

Today is a special day for one of my sisters!!! I want to wish Holly (my 28 year old sister) a happy official 7th birthday.  Happy Birthday Leap Year baby!!!  I love you and I'm so thankful you're my sisters and that we have such a special bond.

On another note, I was featured again.  YAY! Yipee! Woo to the Hoo! Yee-Haw! Shannon & Dean have an amazing blog, AKA Designs, where they feature thrifty decor finds, home decor tips, DIY tutorials and much more. They have amazing style, so of course, I was honored and giddy when they featured my apron holder on their site.  Be sure to click the link below and check out this amazing couple and their work, along with my feature.


For today's project that I'm sharing, first I'll apologize for not getting good before pictures, and secondly, I'll give you a background story.  Client "A" had this piece below:
 It was a plastic piece with a factory finish.  That client wanted me to give her some samples of some painting techniques and styles similar to that inspiration piece that I could recreate, but with texture, to paint on an armoire.  So, I got some boards from our stash and used some plaster of paris to create texture.

 Next, I painted them in shades of gold, silver, champagne, black, and so on....and here's where I forgot to take a picture and my client has them at the moment.  So, back to story.  Client "B" saw the sample boards in my car and fell in love.  She had a tin piece that she wanted to paint similar for her living room.  Failure again for team Heather...no before picture of the tin.  Picture whitish, rustyish, creamish, blackish, chipping tin.

I started by spraying the tin silver.  Then I used a gold metallic color from Modern Masters (avail at Benjamin Moore). 
 After the silver dried, I brushed the gold on with a sponge brush in sections about the size picture below.
 I then wiped the gold back off, leaving more of a champagne color behind.  You can see in the picture below slight hints to the right of the actual gold before it was wiped off and then the majority of the picture shows you what it looks like after wiping the gold off.

 My client was trying to bring in colors of a lavender chandelier she had, so I used variations of light and dark lavender throughout.  Some places I painted and then wiped off, some places I just wiped it on in streaks and left it as is for added boldness.
In the picture above on the outer edges is an example of where the dark lavender was painted on then wiped off, softening it's look.  Below is the finished product.  This picture doesn't even do it justice.  The colors of silver, gold, champagne, black, and lavender all flow together so good.
For this piece, there wasn't and exact method.  Some painting with a rag, sponge brush, actual sponge, and my fingers.  Some places I left the paint, and some places I wiped it.  Some areas are streaky, others are dabbed on.  I just kinda went with what I was feeling and I have to admit...it was pretty fun!  Here's some close ups of certain sections.


 Here it is in my client's house, but my camera (or ahem, the camera user???) just doesn't capture the quality of the colors.


 Also, she had the painting that you see in the picture below placed on a high ledge in her kitchen.  She wanted me to make a flower arrangement to pull out the colors in it, so here's what I came up with:


February 23, 2012

Frame Change

Well, today has been a busy one.  I just walked in the door.  I worked at the Thrift Shop today, and then took a car load of things to my booth at De'France.  I sold two big dressers out of there yesterday so it was looking a little lot empty.  I stopped at a couple of other thrift stores on the way home and picked up a couple new, old furniture pieces on the cheap. Yep, I'm a very proud cheap-o to the max!

When I got home Gauge had all kinds of energy from being put in what he considers prison for the day...the backyard.  Mind you, the backyard would be heaven to some dogs, but since there are no people with him and we have a privacy fence, our little socialite of a dog does not like it.  So, we threw the frisbee for a while, unloaded the car, did some housework, and now I'm blogging!

I'm just sharing with you a super easy quick fix for a frame.  I did this frame for client recently.  She had the gold frame and it had a textured linen-like cream mat in it.  She did not like the cream, nor did it fit with her houses style, so she wanted to make the entire piece gold.  My apologies...these pics are all with my phone camera.  I managed to get away without getting you a fully completed picture, but in the picture below you will get the idea.

 This picture shows the cream mat and the parts that I had already painted gold.
 Another view:
 To do this, I simply used Liquid Leaf (purchased at Michael's).  I would much prefer Hobby Lobby, but my closest one is an hour away.  Bummer!  This is an example of liquid leaf, but I actually used the Renaissance Gold color and just painted it directly on with a small, inexpensive artists' brush.  Super easy and totally transformed the frame into an even higher-end frame than it already was!